

Jesse
This is Jesse, one of our VW buses. I purchased her from the original owner on Dec 1st, 2000 (which happens to be my wife's birthday) with 27,000 original miles. She is a 1989 Volkswagen Vanagon Westfalia Camper. Westfalia outfitted Vanagons with two beds, one upper one lower. A propane two burner stove. A three way refrigerator (Propane,12V,110V) A sink ,several quality cabinets, etc.etc...They are quite cozy and comfortable to travel and camp in. Small enough to squeeze into tight spots, and large enough to plug in and spread out.

Well, Jesse has carried us from the east coast to the west coast. From Canada to Mexico and thousands of places in between. My wife and I even honeymooned in this bus and had the time of our life touring the Southwest United States. It has taken us down the east coast and through the outer banks. We have toured the Great Lakes. She carried us to the Olympic Peninsula in Washington state and down the west coast and back to Chicago. Jesse has even toured Europe as the original owner, Dr. McCarthy, took delivery on this bus in Germany.
We have logged over 108,000 tough miles with her. She has never let us down. A jump start here and there because of pilot error and we cracked an exhaust pipe in Wyoming once, but she never left us stranded.Though, I have done my best to maintain her, time takes its toll.
Late model US spec Vanagons are equipped with a water cooled horizontally opposed motors.These water cooled, boxer motors have a tendency to leak coolant from the heads. And at 30,000 miles the original 2.1L , 90 HP motor had developed a leak in the right head gasket. I was very aware of this and watched the coolant levels like a hawk for years. About a year ago the original clutch was starting to go out. A very easy fix, however I knew it was time, time to listen to the inevitable, and face the facts. She needed more than a clutch. It was time to go over all of Jesses' needs. After all she was 25 years old ! We decided to spend the time, money and energy to rebuild her. The amount of enjoyment we experienced in her, and all the fond memories we just had to invest in her future. At this point she feels like a member of the family. There are several options to replace the VW water boxer. I like a horizontally opposed motor. I prefer original VW parts whenever possible. So, I have replaced the 2.1L 90 HP engine with a fully rebuilt 2.5L 125 HP motor from GoWesty. This is a VW block given a serious once over by the pros at GoWesty.

Here she is.
I will not get too technical, just a summary of the work completed,
The original 2.1L engine removed from engine bay.

Might as well detail the engine compartment with the motor out of the way.

Assembling the engine.


The original thermostat housing was plastic. When we removed it, it had cracked where the brass fitting was and bulging, getting ready to burst . I decided to go with a billet aluminum version this time around.

The 2.5L GoWesty Engine installed.
Jesse has been kept virtually a stock Vanagon with a few minor exceptions. However, since I have installed a non stock high performance engine, I have decided to go to town on customizing her. Hence all the below modifications. I have taken care and effort not to drill any more holes than are needed and if possible use what exists already. I also feel the modifications are for improved safety and to modernize a few conveniences.
We are planning a long well deserved camping trip this summer. Therefore , I am trying to do all the repairs and mods before we depart. I will add stories , photos, to this blog during our trip....so stay tuned.
Since the engine is in the rear and the radiator is in the front.There are a LOT of coolant hoses. We replaced most all coolant lines and hoses, stainless steel where available.

To explain the cooling system nicely, it's ridiculously complicated .
Now I am realizing why I love air cooled VW's !
The lines that run the length of the vehicle were plastic originally and had started to collapse at the ends.
We replaced them with stainless steel
We replaced them with stainless steel

Also replaced all four CV joints, New Clutch and pressure plate, clutch slave cylinder and starter bushing.All new ignition system parts. A complete stainless steel GoWesty exhaust, except the catalytic converter. I love this exhaust system, only one miss by GoWesty, the front mount no longer attaches.This concerns me, though they insist it is not needed.


Magna Flow Muffler
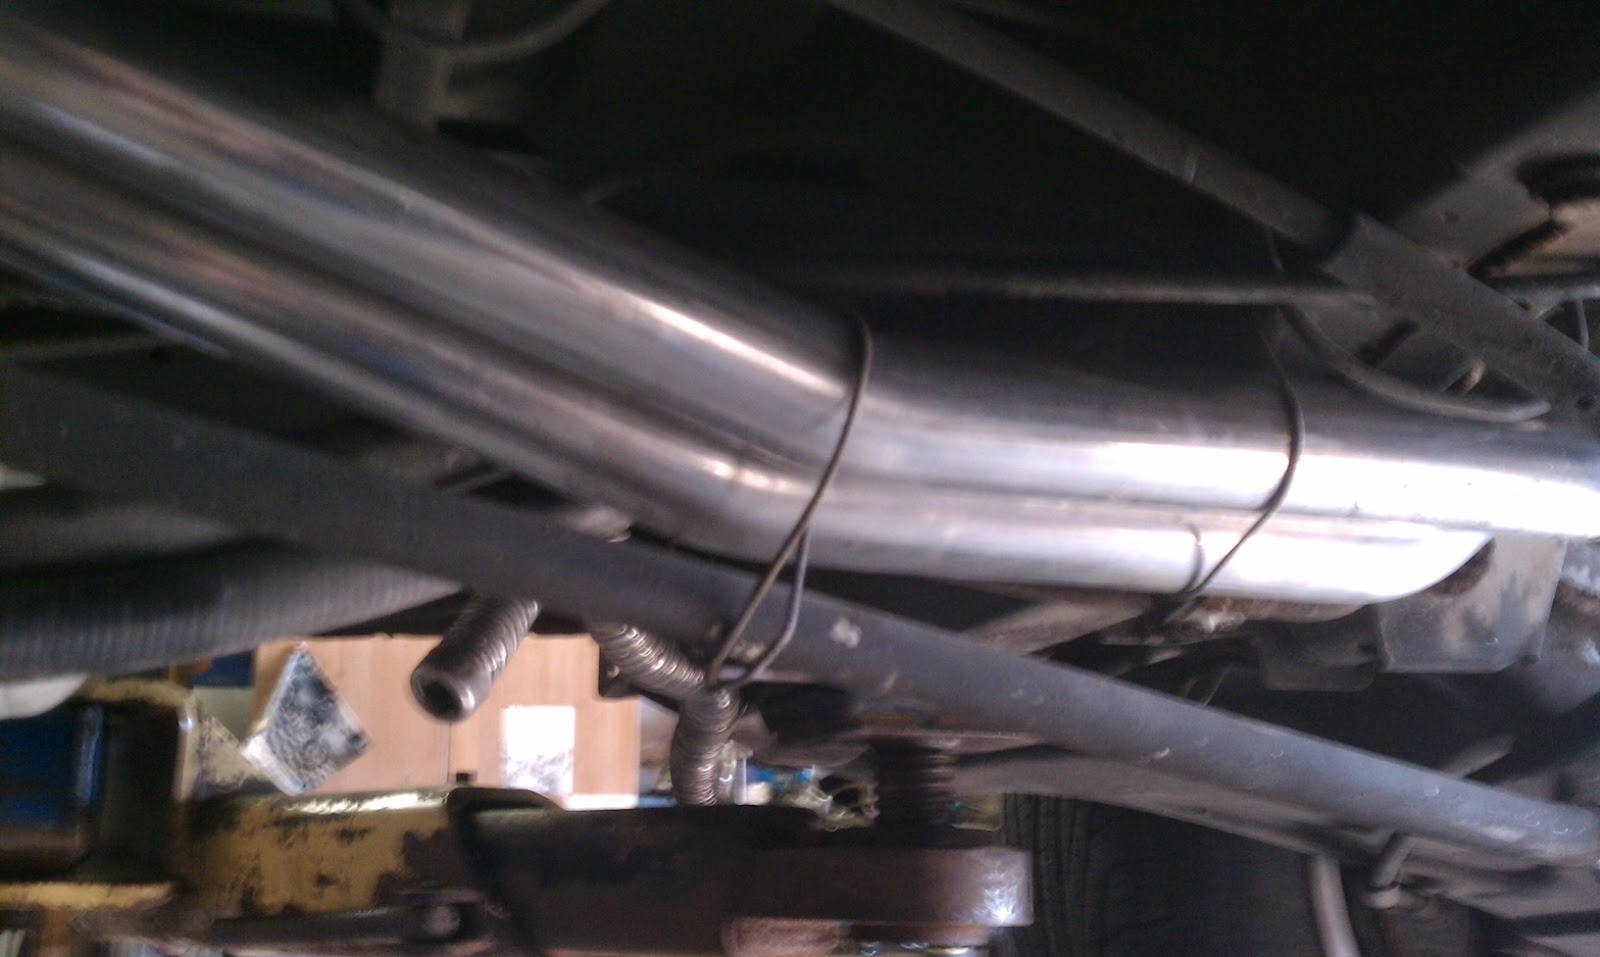
All new fuel lines, pump and filters. This is one of the most important replacements any old car must have to maintain safety, no need to explain this fact. Also, I replaced one the most important parts in the fuel system.It is the spigot which joins the fuel line from the body to the engine compartment. I assume this was in place for times when the engine was removed. Anyway, this was originally made of plastic. These are generally referred to as "The Firestarter" in the Vanagon community. They crack, fuel leaks and fires are started. The great guys at Foreign Auto and Supply tool these out of aluminum. Jesse received this implant.

New Control Arm Bushings and re-aligned her.

Old rusted power steering lines .

"New" used Power steering lines brazed into place.The person I purchased them from cut them in half to make it easier to ship...duh !! I had to braze the halves back together.

New Bilstein shock absorbers and progressive springs all around.And the best safety improvement of all....a set of South African big brake rotors and calipers up front. There have been times when driving down rather steep grades I would experience brake fading. This should relieve that problem. I painted the calipers Porsche red.

Speaking of safety.....I have always disliked the headlamps in this 25 year old jewel. It was unsettling to not know whether my headlights were on or not. So, I busted out and installed the South African headlamps which then allowed me to increase the wattage and added inner driving lights as well. No debate now when your turn these bad boys on.

The old

The new
The above work was all completed summer of 2013. Over the fall I was able to drive it over 1000 miles to complete the first stage of engine break in process. I followed the break in guidelines to a tee. She is running amazingly well ! The new torque and hp is very noticeable and appreciated. I am loving it !
Here is an image in the Upper Peninsula of Michigan. Jesse's first camping trip after her nip and tuck.

 |
| "Where are the keys ? " |
Did I mention we love dogs! How appropriate, we have a West Highland Terrier....a Westy!
 |
| MacGregor |
Well, Jesse spends the winters stored in our garage, hence a perfect opportunity to modernize a few electrical/miscellaneous items.

A new drivers side propane tank. The original was getting rather rusted and did not have an updated fill valve. I don't want to mess with a potential missile under our bed.

In 2004 I added a propane heater under the rear bench seat. I wanted my bride to be warm when camping in the desert at night. At this time I added a second propane tank on the drivers side as well. Here's an image of the Propex propane heater.

I had procrastinated for years to build a protective box for the heater. When I removed the stock rear heater core during the engine swap (it used to reside where the painted metal area is), I then used the stock heater cover that Westfalia had installed originally , modified it and used it to cover the Propex heater.

Then I carpeted the area.

Since I removed the stock rear heater it presented an aesthetic problem...the heater vent that was cut out of the panel under the back seat was no longer needed, leaving a gapping rectangular hole in the panel. I toyed with the idea of filling the hole with lighting or maybe the power inverter.
Then I noticed GoWesty made these blank panels. The color is slightly darker than the original , but this saved a lot of work. Just drill the holes and install it. I like the clean stock look.


Installed
Another obvious omission from the stock Vanagon was ample lighting. Especially for a camper which needs task lighting. So ,I then added several light emitting diode lamps. Two over the captains chairs, one under the rear seat, one in the wardrobe closet and one in the rear storage area.
Here's an image with all of them lit.


The next under taking was the stereo. It was an antiquated system that was due for a change.
The speaker locations are very limiting. I did not want to change speaker locations. So a fresh set of 5" Polk Audio speakers for the front doors and 5 1/4" Infinity's for the rear and a new Kenwood head unit .


The old Kenwood on the right and the new Polk Audio on the left.
The difference in sound quality is substantial !

The Polk Audio speakers did NOT come with grilles. Therefore, I had to cut and grind the new Polk Audio speakers to fit into the old Kenwood frames.

The size of the speaker is not conducive to quality sound , especially bass. The obvious solution, a sub woofer. I did not want to waste too much, if any, storage space.One of smallest subs on the market.....the Kenwood KSC-SW11 sub woofer !

I wasn't sure how this would sound . But, well worth the money and effort.

Especially since I was able to squeeze the Sub Woofer
into this hidden, empty, non used space.

The sub woofer comes with a remote control so I do not have to blow out my wifes' ears.

I had originally planned to run the wire for sub woofer control through the second battery compartment ( using the hole where the seat belt wire runs). This cable would have had to be fished in the opposite direction of all the other wires. Well, when push came to shove, I forgot . So I attached the wire to the table stand for now. I figure when I change all the water lines, I will re-run this cable so that it is hidden from view. Man, I am picky !
The other modification I have been wanting to install is a dome light for the side sliding door. Not having a light to come on when someone opened the sliding door was a huge miss. So, I ran wires through the B pillar and modified a fresh air duct to accommodate a dome light and installed a switch in the door jamb.


These modifications are like adding new tools to a Swiss Army knife , my next thought was how we needed exterior lighting. Awning lights are very popular, but I didn't want cords running through Jesse's interior. So I devised this....in the passenger side air vent panel above the sliding door ,12 volt outlet with a 5.5mm DC jack as well.


Installed
Now it's a breeze to wire the outdoor awning lights with the 5.5mm outlet and an additional auxiliary outlet for a passenger map light..etc..etc..
I also added a 12V outlet in the rear closet so we have access to power from the rear hatch area.

Every camper needs a dependable, accessible flash light ! I mounted it on the B pillar right inside the passenger door and the sliding door ,since this is the side of the bus used extensively when camping.

I installed a power block inside the B pillar to accommodate all of the added wires, and make the wiring less obtrusive.


Well...I just couldn't stop there. I thought...how about a power inverter, and a battery charger for when we are plugged in at a campsite. Also updated my old auxillary DC power supply with a new version which includes two USB ports.

A marine dual battery charger mounted under the sink.

After fishing all the wires for the Kenwood sub woofer, 5 LED lights, Propex heater, dual battery charger, power inverter, 12V fan,LED rechargeable flashlight, and the Westfalia galley wires I ended up with a spaghetti bowl of wires.


The second battery I installed sits under the drivers seat, the seat is removed in this picture. All of the accessories are wired to the second battery.
Here it is installed and the wires all sorted out and hooked up. I also added a second fuse panel and a battery isolator in this compartment where the original relay was located.

Sometimes stupidity can overwhelm. I wanted to change the cigarette lighter in the dashboard as it spins in the dash and at times has shorted out. One of the last "to do" items on my list. I replaced it easily. Then I realized all my accessories on the same fuse as the cigarette lighter were not working. I checked and all fuses were okay...triple checked all fuses okay. I thought I may have pulled a wire loose while crimping the new connectors for the lighter. So, I started removing equipment to find a loose wire. Ended up removing the stereo,dash pod, heater control, rear heater control, dropped the fuse box. NOTHING !
What the heck ! I lost sleep over this.I knew it had to be something easy, as everything worked prior to this.I was stumped. How could I have successfully completed all of this wiring and screw up on such an easy install...I reached out to the Vanagon email list and asked if anyone could help....Mark, from the list, reminded me of the secondary fuse under the drivers seat. YES, that was it ! A 5 cent fuse. How could I be so stupid.I INSTALLED this secondary fuse, and I forgot to check it ??
Goes to show when you modify something, you must remember, label and note the wiring changes. Oh well...learn and move on.
The original style lighter snaps into the dash via two small tabs on the outer part of the lighter. This is the culprit for them to spin inside the dash. I replaced it with an outlet that has a threaded housing. After all I went through to replace a $10 part, I do not want to again.

Well ....while I had the dash disassembled for no reason, I changed the heater control bulb and removed the ignition key relay buzzer.
I choose to remove the a/c when the mechanical overhaul started. Hence, I removed the compressor from the engine and removed the evaporator which was mounted in a vented unaccessible cabinet above the rear bunk. This enabled me to widen the vent opening and clean and carpet this cabinet in order to now use it for storage.

Had to have something nice to hold onto...and here it is;
A Momo shifter.

Another cosmetic improvement was to remove the GoWesty center caps from my wheels and finally fit something more appropriate.My friend Chris and I augmented a set from a Tiguan. Another cosmetic change that took me years to finally finish.

The original Westfalia decals on the pop-top had seen better days. The edges were ragged and they were faded. Not anymore. Honestly, I believe I bought these 10 years ago and we finally installed them. Thanks to my buddy Chris for his help ! He did this for me while I painted the wiper arm assemblies.What a nice guy and a great job.


Removed the original rear stone guard decals and installed new oem wheel well
protectors. The original ones had yellowed and cracked. The new ones are hard to detect.


After years of wanting to install pin striping....I pulled the trigger. I had the great help of my buddy Chris. He has been pin striping for years and has a good eye. I had to decide what colors, size and most important location. Here is what I decided. I hope it is subtle. I did not want anything garish.We used an 1/16" silver over the belt line and a 1/8" Black IN the bottom of the belt line. Hopefully this accentuates the great lines of the box on wheels.


While on the subject of sticky things....I always wondered why my Westy did not have the Westfalia logo decals on the luggage rack. Could it be that this bus was a German delivery ? I'm not sure....but I wanted to promote Westfalia every way I can, so I added them

I broke the rear emblem some how.....I installed a new one, and painted all the wiper arms as they were scratched and nasty.


One original item that I kept having to replace over the years was the 110V outlet mounted on the drivers side of a Westfalia Vanagon. The back side of this plastic housing would bust apart and cause the back of the outlet to hang by the three wires. I ordered an original retooled better version from Bus Depot (Delta Six). I also ordered a beefed up GoWesty designed 110V outlet. The GoWesty version was far superior. I installed this design, and I am very satisfied as this will be very hard to break....I'll try. :)

Finally a very easy install...a pair of WeatherTech wind and rain deflectors . This took all of 5 minutes. I needed an easy job today. :) Not quite sure I like these. They are right in my field of vision when looking left or right. I will reevaluate when I drive in the rain or a long road trip.

God is in the details....covered the awning screws with plastic covers, no more scratching my fingers when I wash Jesse.

I bought a pair of spare original keys from The Bus Depot and had them cut . I know these won't be available for very long.

There are several more mods I will be undertaking in the next few weeks.
-Paint the lower rockers black. The ugliest part of the bus is the lower rocker weld points.
-Clean all the grease/dirt from the sliding door track.
-Install factory mud flaps.
-Install a passenger side grab handle on the drivers side A pillar. (I know there are wires in there ! )
-Install all new water lines for the galley, as they look moldy.
-Sand and clean all engine grounds.
-Paint the headlight rings and area black. I don't like that I can see the zinc plated headlight rings and screws through the new grille.
-Install second driving light switch to allow outer and inner lights to be switched separately.
-A Yakima bike rack.
Here's a link to the Yakima site;
I am sure I will conjure up more things to spend my time on to "improve" Jesse. And you will be the first to know. Thanks for your interest. If you have any comments , please advise below.

More to come.

Nice work, I wish my bus was this nice. Keep us all posted on your new modifications !! Thanks for sharing .
ReplyDeleteThank you, will do. I have several new ideas to try.
DeleteAwesome blog. I too wish my Westy was in this condition. The mods you are making are great and I'm likely going to attempt to use them. Thank you so much for all the info!
ReplyDeleteThank you Tristan. Let me know if you need any help. Best of luck with your westy !!
DeleteI like your van I have a 1989 westfaila
ReplyDeleteThank you.
DeleteAwesome stuff!! What did you use to remove the rear stone guards?
ReplyDeleteThanks. I used 3-M decal remover and a little elbow grease. They came off pretty easy.
DeleteWhat a magnificent job you've done! Can't show this blog to our poor, scratched-and-dented '86 Weekender "Monty" because he'd be jealous and want at least a few cosmetic fixes of his own.
ReplyDeleteWhat a magnificent job you've done! Can't show this blog to our poor, scratched-and-dented '86 Weekender "Monty" because he'd be jealous and want at least a few cosmetic fixes of his own.
ReplyDeleteCosmetics won't get you to the campsite. :) Is Monty a runner ? If so, that's what matters. Cheers to Monty !
DeleteVery impressed and inspired. One of the nicest buses I have seen!
ReplyDeleteI have an 1985 and I'm kinda doing all the stuff you have done, slowly but surely.
Couple of questions can you send me a direct link the supplier of the aluminum fuel spigot? I looked up "Foreign Auto and Supply" but came up empty. I have seen other repops of this item but nothing like this.
Also do you have more detail on the lighting switches used in the cabinets?
Great blog and I wish you many more safe travels.
Deniz
denizbenjamin@gmail.com
Hi Deniz, sorry for the lengthy delay....here's their link. BTW...You can also save money and eliminate the fuel spigot. Cheers and Happy Travels ....http://www.foreignautosupply.com/
Delete